We have just issued an automatic update for the Vantage range of products, including Vantage Ultimate and the Web Module.
Unfortunately there are two issues with the Web Module auto update process. Everyone on a 64 bit operating system will encounter issue #1 (Unable to locate installation location), and some of you may encounter issue #2 (System.IO.FileLoadException).
This article describes the errors and how to work around them to successfully update the Web Module.
Issue #1
The usual process to update your Web Module is to log into your Web Module server, right-click the WebSpy system tray icon and select ‘Check for updates’.
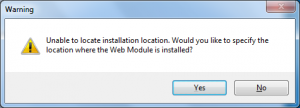
If you do this on a 64 bit operating system, you will receive the following error:
You can fix this issue by clicking Yes, and specifying the Web Module’s installation location, which is usually somewhere under c:inetpubwwwroot (or just c:inetpubwwwroot if you didn’t specify a virtual directory when installing).
This will allow the updater to continue and you will be prompted to download and install the latest update.
Issue #2
Unfortunately, you may encounter another error during the update installation. The text of the error will be something along the lines of:
System.IO.FileLoadException: Could not load file or assembly ‘ICSharpCode.SharpZipLib, Version=0.84.0.0, Culture=neutral, PublicKeyToken=1b03e6acf1164f73’ or one of its dependencies. The located assembly’s manifest definition does not match the assembly reference. (Exception from HRESULT: 0x80131040)
Work Around
We are currently working on solutions to both of these issues. In the mean time, here is a work around to install the update. On the Web Module server:
- Download this file:
http://update.webspy.com/autoupdate/files/vantagewebmodule/vantagewebmodule2.2.0.18.zip - Stop IIS (See instructions below).
- Right-click the WebSpy system tray icon and click Exit.
- Backup your existing Web Module installation by copying everything in your Web Module’s installation folder (usually under c:inetpubwwwroot (or just c:inetpubwwwroot if you didn’t specify a virtual directory when installing) into a completely separate location (i.e. don’t keep it in a sub-folder).
- Extract the downloaded zip file to your web module’s installation folder. Overwrite all the existing files.
- Start IIS (see instructions below).
Your Web Module will now be updated to the latest version.
Stopping and Starting IIS
In IIS Manager (Start | Control Panel | Administrative Tools | Internet Information Services (IIS)) , right-click the site you want to start or stop, and click Start or Stop
We sincerely apologize for the inconvenience and will hopefully have a solution out soon. If you have any problems with the process above, please contact support at webspy dot com.


Thanks a lot had been facing the first issue. I read through and followed the instructions and that solved the problem for me.