I’m frequently asked about the best way to setup and report on file or folder accesses. In other words, I have a bunch of confidential files sitting on my network and I want to know who is accessing them.
So here it is (you might want to grab a coffee first!).
Unless you have a sophisticated endpoint security or file auditing solution in place, you’re pretty much limited to the quality of data found in your Windows Security Event log. By default, accesses to your confidential files are not going to trigger any entries to be written to the Event log. You first need to set up file or folder auditing.
Configuring Windows File and Folder Auditing
First, turn on Object Access auditing by going to Control Panel | Administrative Tools | Local Security Policy | Local Policy | Audit Policy and set Audit Object Access for Success and Failure.

Windows Vista Local Security Policy
In Windows Explorer, navigate to the folder or files to audit, then Right-click | Properties | Security | Advanced | Auditing and click Continue when Windows User Access Control gets in the way.
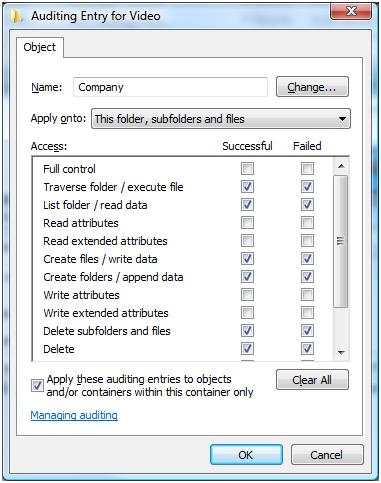
Here you get the option to add Users or Groups to the audit policy. So if you only want to know when Joe Bloggs access the file/folder, then only add Joe Bloggs. If you want to know when anyone accesses the file/folder then add your entire company.

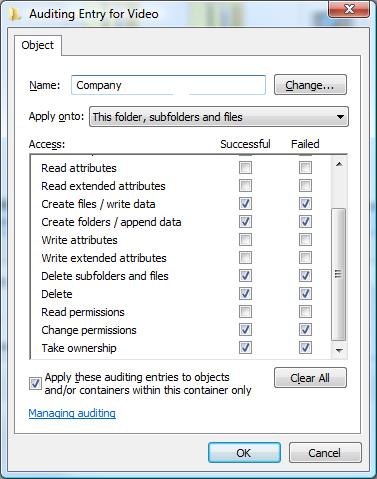
Scroll….

Click OK and apply the changes. If applying this to a folder, take note of the setting to ‘apply the auditing entries to containers within this container’ at the bottom and use as required.
Congratulations. That’s the auditing setup. Once people start accessing these files(s), the auditing information will get recorded to the Security Event Log on the machine that hosts the file(s) in question.
Importing Windows Event Logs into WebSpy Vantage
The next step is to import the Windows Security log into WebSpy Vantage.
- Run Vantage as Administrator (right-click the Application, and select Run as Administrator). This is required to access the Security Event Logs.
- Go to the Storages tab and click Import Logs
- Run through the Import Wizard with these settings:
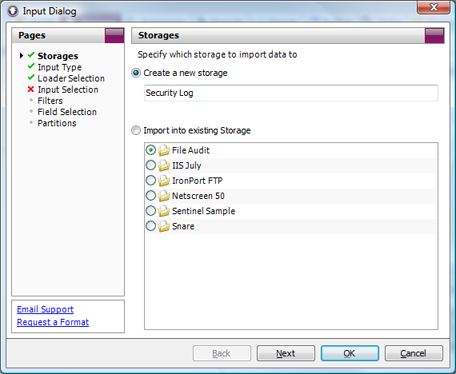
- Storage: New storage

Input Dialog: Storages Page
- Input Type: Windows Event Log

Input Dialog: Input Type Page
- Loader Selection: Microsoft

Input Dialog: Loader Selection - Input Selection: Add
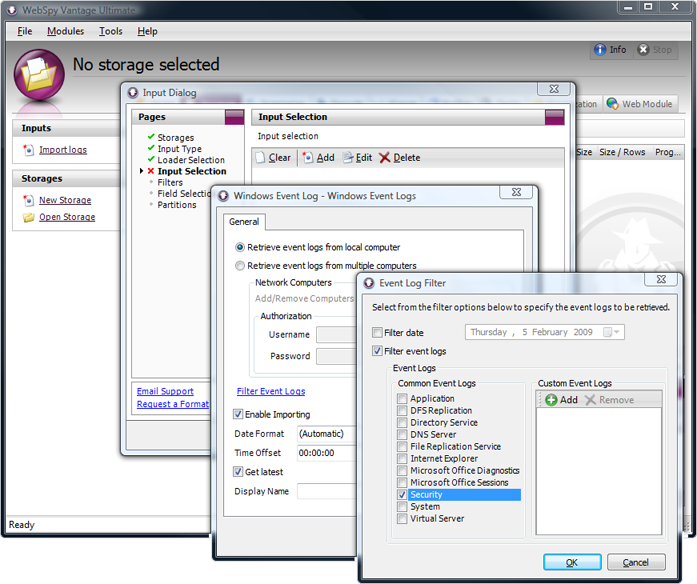
Select either local computer, or multiple computers, enter authentication details and Click ‘Filter Event Logs’. Check the ‘Security’ Log and click OK.
Input Dialog: Input Selection Page – Adding Event Logs
- Click OK to start the import.
If there are any issues with the import process, consult these three WebSpy Knowledgebase articles to do with issues importing event logs:
- Event Log Troubleshooting (Known Issues and Fixes)
- Importing Event Logs from machines on a different domain
- Required Services for Event Log Importing
Analyzing Windows Event Logs with WebSpy Vantage
Once data has been imported into your storage, check it out on the Analysis screen.
To do this, go to the Summaries Tab, Run an Analysis on your new storage (ad-hoc analysis will do), and go to the Category Summary.
There should be some ‘File System’ items there assuming the file has been accessed since setting up file auditing. You can then drilldown to Event Type to see ‘Audit Success’ or ‘Audit Failure’. To see who has Successfully accessed a certain file, drilldown into the ‘Audit Success’ item.
Unfortunately, the good stuff is buried in the ‘Message’ field, which you can only access in the Individual Records view. This is because the Message field in Event logs is free form and could vary wildly resulting in millions of unique items. A Message Summary has therefore been excluded from a default ad-hoc analysis for very good performance reasons.
Event logs can also be quite verbose, and if you drilldown to Individual Records at this stage, you’ll see lots of messages like ‘A handle to an object was requested’ which probably isn’t of any great value from a reporting perspective. One way to filter out this noise is by Event ID.
I’ve discovered that the events that correspond to ‘An attempt was made to access an object’ have the ID 4663. So go to the Event ID summary and drilldown into 4463 to the Individual Records view.
Once you’re at Individual Records, you can hover over the message field to get details. You can also use the find edit box to search for a particular user or file:

Drilldown into Successful File System Accesses (Event ID 4663)
You can export this view to Word Document, PDF, HTML, Text or CSV by right-clicking the Individual Records summary and clicking Export.
Reporting on File or Folder Access with WebSpy Vantage
Analyzing data is great for ad-hoc where you’re not really sure what events you need to analyze. Just just need to dig through the data.
But once you know what event you need to analyze, and the fields you want extract about these events (such as the Message field), you can also create a report template to access this same information.
For example, to add a table and chart to a report that displays an Event Message:
- Go to the Reports Tab and click New Template
- Create an Analysis template based on the ‘All Windows Event Schemas’ schema
- Click New Node and select Message from the Summary dropdown.
- You can click Advanced to add more columns to the table, change the chart type, add filters etc. Otherwise, click OK.
To filter the report:
- Edit the node you want to filter, and go to the Filters page of the dialog. Alternatively, click Template Properties to apply the filter all nodes in the template.
- Click Add | Field Value Filter. Select Category from the Summary drop down, and click Add. Enter ‘File System’ (without the quotes) and click OK. Click OK to add the filter.
- Click Add | Field Value Filter. Select Event ID from the Summary drop down and click Add. Enter ‘4463’ (without the quotes) and click OK.
- To filter on the Message field, Select Add | Field Value Filter. Select Message from the Summary drop down and click Add. Enter any strings you want to filter by, surrounded by *. For example, to find messages that relate to ‘scott’ accessing ‘avi’ files, click Add and enter ‘*scott*’ (without the quotes). Then click Add again, and enter ‘*avi*’ (without the quotes).
WebSpy Vantage comes with a pre-built template called File Access Report that you can use, or duplicate and modify for your own requirements. Just go to the Reports tab, select the File Access Report (which will only show once you have imported some Windows Event Logs into a Storage), and click Generate Report or Publish Report.
That’s it! Now run your report, automate it using the Tasks screen, and your set!

Leave A Comment