What is an Alias?
As defined by Google, in computing terms, an alias is:
An alternative name or label that refers to a file, command, address, or other item, and can be used to locate or access it.
When it comes to WebSpy Vantage, an alias takes log data that does not make sense and clarifies it to something that does. But it also can be used to do a whole lot more.
Consider the following use case.
You are required to produce a report that shows employee Internet usage. But it should show usage only during works hours, and only during weekdays. If an employee wishes to use the Internet outside of business hours it should not be reported on.
I recommend that you follow along while looking at a Summary Analysis. Let’s start with the basics.
Aliases for Translation
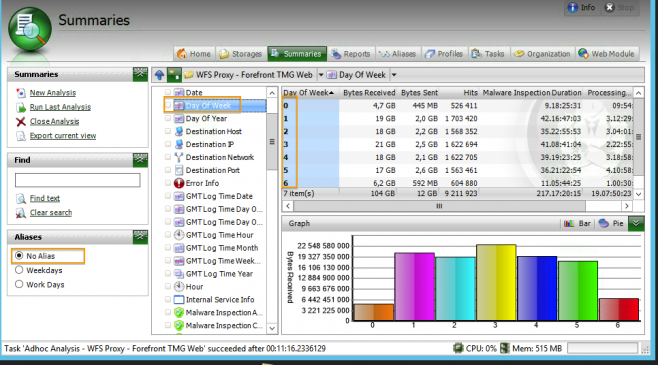
When systems log data they log in an efficient manner. For instance, TMG does not log the day as Monday or Tuesday; it logs it as a single integer value between 0 and 6. This obviously has a significant advantage when it comes to logging. However, when it comes to looking into the logs that same efficiency becomes a penalty.
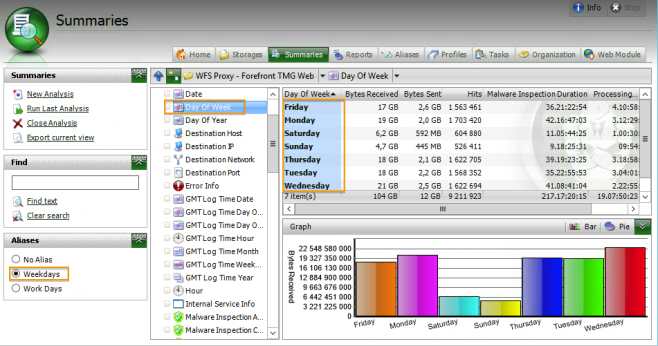
Instead of being able to simply look at the days, you are faced with a list of numbers. The alias allows you to translate those into more understandable terms. By selecting the Weekdays alias, Vantage displays the “translated” alias values. The numbers are replaced by actual days of the week. The Weekdays alias is one of the many aliases available ‘out of the box’ with Vantage Ultimate.
Aliases for Grouping
The example above is a simple one-to-one translation, but aliases can also be used to group multiple items. We could use the Weekdays alias to select our five ‘workdays’ but we can make this a little simpler by creating another alias to group workdays together.
Here’s how to do it by creating a simple alias.
- Select the Aliases Tab
- Click New Alias
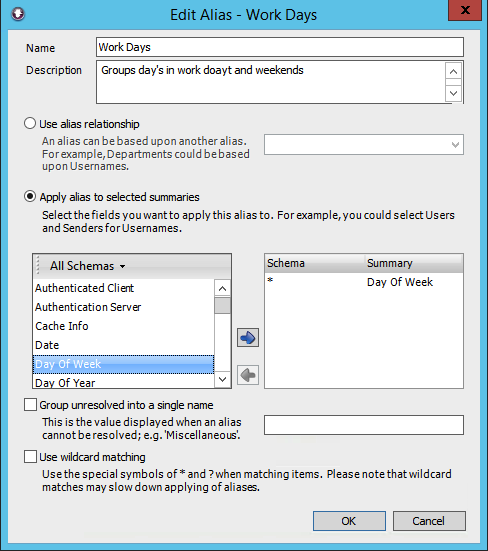
- Specify the name “Work Days” and add a description
- Select “Apply alias to selected summaries”
- Select All Schemas
- Locate and select Day of the Week and add it to the right with the blue arrow
- Click OK
The alias has now been created but it has no definitions in it. To add the values, perform the following steps:
- In the list of Aliases, find and select the one you just created
- Right click in the empty window section
- Select Add
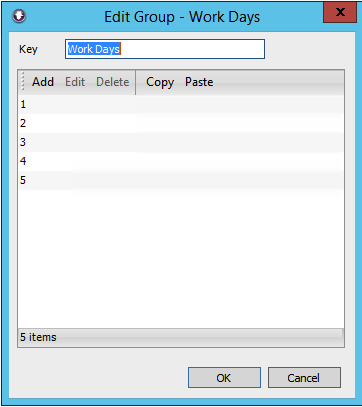
- Specify “Work Days” as the Key.
- Click Add and specify 1 as the item
- Repeat step 5 for all numbers between 1 and 5
- Click OKOK
- Right click in the empty window section
- SelectAdd
- Specify Weekends as the Key
- Click Add and specify 0 as the item
- Click Add and specify 6 as the item
- Click OK
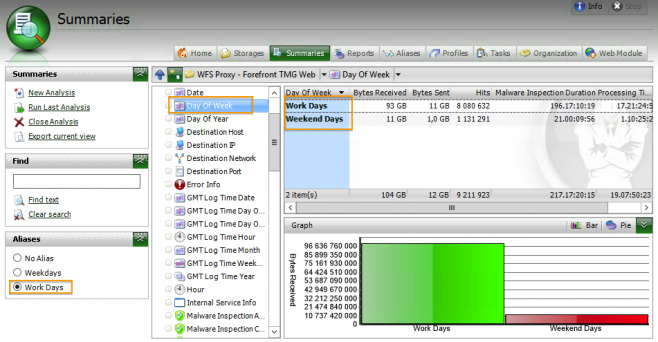
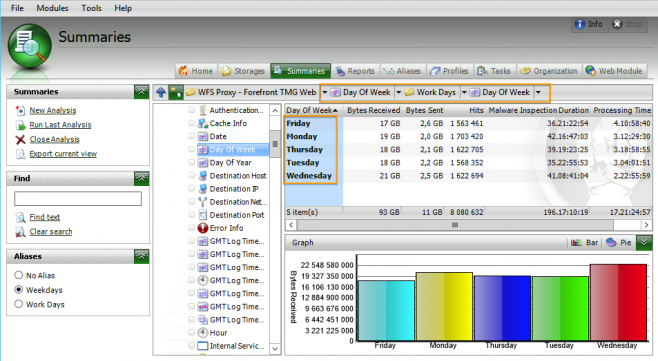
Now that we have our new alias we can see how it works on the Summaries Tab. If we look back at the Summaries Tab there is an additional alias for Work Days. Selecting this alias splits all the days into either Workdays or Weekend days
- Go to the Summaries Tab
- Select the Day Of Week Summary.
- Select the “Work Days” alias in the Aliases task pad (bottom left).
Selecting this alias splits all the days into either Workdays or Weekend days.
Aliases for Filtering
As the analysis shows, you have now been able to not only translate but also group items with the use of aliases. This is great for making reports easier to read and understand.
Here’s where it gets awesome. If you click on the item Work Days, it will now analyse only the work days, ignoring the weekends. Effectively you are now using the alias as a filter. That’s right, aliases can be used in queries filters and expression.
Combining Multiple Aliases
Up to this stage we now have a simple way to group or split the weekdays between workdays and weekends. However, we are also required to only report on the work hours. In our case it will be from 8AM until 5PM excluding 1-2PM for lunch break. We follow the same steps as above to create a new alias, but this time grouping hours instead of days of the week.
- Create a new Alias as above, but this time apply it to the Hour Summary.
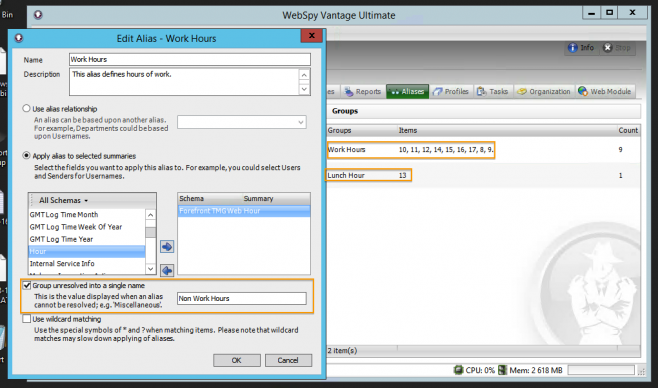
- Add two groups: Work Hours that contains the items 8,9,10,11,12,14,15,16,17, and Lunch Hour that contains the item 13
- This time use the option “Group unresolved into a single name” in the Alias definition. This means that unless I define an hour it would be deemed Non Work Hours.
This is what the alias should look like.
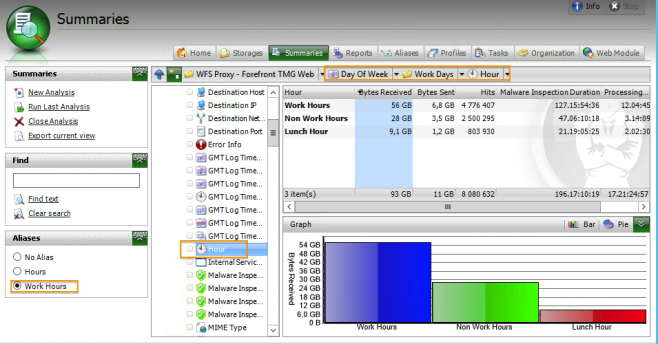
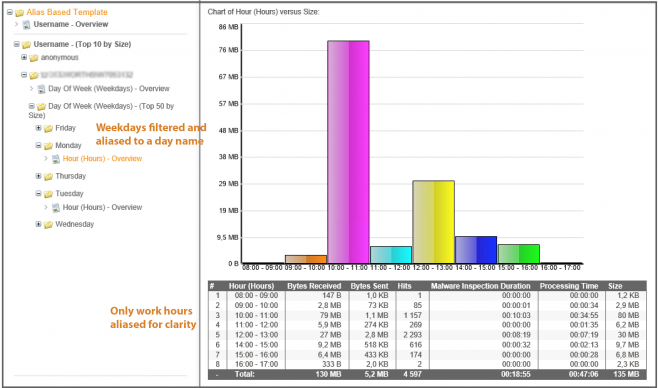
If we use our analysis we can now specify the Work Hours alias to use as a filter.
In the navigation bar you can see that we are now drilling down using the new alias after first alias. Effectively we are applying an alias “on top of another alias.”
Now imagine how tricky this would be to do without aliases!
Note that you can use different aliases for the same summary. When looking at the Day Of Week summary you can simply switch the alias to show Weekdays or Workdays. It is important to note that using an alias does not do anything or alter your log data in any way.
Using Aliases in Report Content and Filters
Using Aliases on the Summaries Tab is great during an analysis, and to test that your Alias is working the way you expect, but they are most useful when applied to report content (template nodes) and in report filters. Let’s create a really simple report, using one set of aliases as filters, and another for display purposes in the report content.
- Select the Reports tab and create a new template
- As I’m using Forefront TMG log files, I will specify the schema as Forefront TMG Web but make sure you use the correct schema for your log files.
- Select Analysis as the Report Type
- Once you’ve added your new Report Template, click Template Properties.
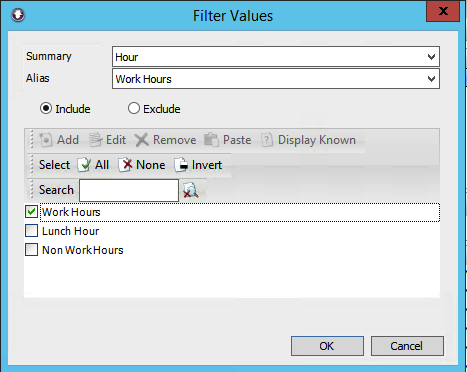
- In the graphical filter editor, click Add | Field Value Filter
- Select Day of Week as the Summary
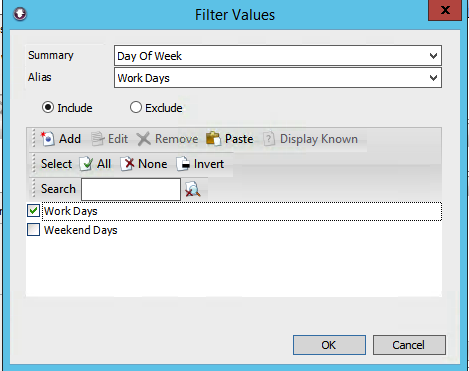
- Select your Work Days alias check and then check the Work Days value. Ensure you have the ‘Include’ radio button selected and click OK.
- Add another filter item, by clicking Add | Field Value Filter
- This time select Hour as the Summary
- Select your Work Hours Alias and check the Work Hours item. Ensure you have the ‘Include’ radio button selected and click OK.
Note, if your lunch breaks do not fall exactly on the hour, you can also use the Add | Time Filter option to specify more granular times to include or exclude.
We have now created a filter that utilizes our aliases to exclude non-work hours and days from the entire report. We can build the content of the report using Template Nodes, and where relevant, specify aliases for translation or grouping purposes.
- Right-click in the template and click New Node.
- Select Usernames as the summary and apply the Username alias (The Username alias can be used to translate the logged domain\username format into a nicer into Firstname, Lastname format. This can be imported from Active Directory using the Aliases tab, or the Organization tab).
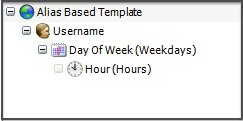
- Once you have added the Usernames node, right-click the Usernames node and select New Node. This will create a sub-node, or ‘drilldown node’. Select Days of Week, aliased by Weekdays.
- Again, select the new Days of the Week node and create a sub-node with the Hours Summary and the Hours alias
The template editor windows show you the summary and if an alias is selected the alias name is in brackets (you can edit the node and change the node name easily). When you run the report you can see the result is an accurately filtered report that is easy to read and understand.
More Alias Features
In this article, I have only just scratched the surface of the Aliasing feature in WebSpy Vantage. There are many other ways you can use aliases to help improve your reports and I hope this article helps illustrate the potential of what is possible.
Try experimenting with alias wild card matching, subnet aliases and alias relationships (aliasing the results of an alias, such as usernames into departments into cities into countries).
To avoid a nightmare data-entry task, you can import values from a CSV file, and even export alias values to CSV for use in other applications!
There are also special wizards on the Aliases tab to import information from Active Directory, and Resolve IP addresses found in your storages by querying your DNS server. The Organization tab in Vantage provides a nice user interface to import your organizational information from LDAP and populate your aliases in the background.
You can also easily resolve string matching conflicts using the troubleshooter.
Aliases are incredibly useful and I invite you to explore all of their features. Let me know the way you’re using aliases in the comments!

