A great feature of Vantage Ultimate is its ability to publish reports and storages to the Web Module so that users can login, view their reports and analyze data. But no one wants to have to remember yet another username and password combination to login to the Web Module, so make it easy on your users by using Windows Authentication. This way, as long as a user is logged into their Windows machine with their Windows domain username, they will sail straight into the Web Module without being prompted for a username or password.
To use Windows Authentication, there are just a few things you need to do.
- Set the Web Module’s Authentication type to IIS Integrated, and add your administrators in the form of domainusername
- Enable Windows Authentication and disable Anonymous authentication in IIS.
- Ensure all users in your Organization screen have a login name in the form of domainusername. Use the ‘Prefix’ option to prefix “domain” (without the quotes) to your usernames names when importing your Organization from LDAP or LDIF.
- Connect Vantage and the Web Module using the new authentication details and synchronize your Organization.
1. Set the Web Module’s Authentication type to IIS Integrated, and add your Administrators.
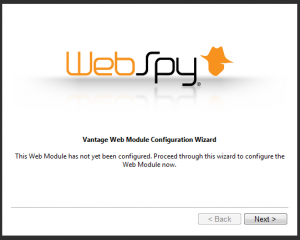
When you first install the Web Module, the first screen you see is the ‘Initial Configuration Wizard’ that guides you through the process of selecting your authentication type and specifying your administrator(s). If you have already been through this Wizard and are currently using Vantage In-Built or Client Certificate authentication, you can easily reset this initial configuration wizard. Simply login to the Web Module with your current administrator details and go to Options | Maintenance | Reset Initial Configuration Wizard.
Note: You can also change your authentication and administrator options individually using the Authentication and Administrator options on the Options tab of the Web Module. However, for ease of demonstration, I’ll use the Initial Configuration Wizard method.
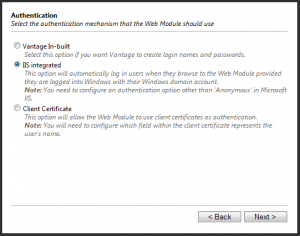
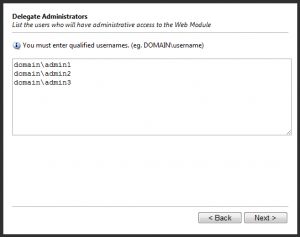
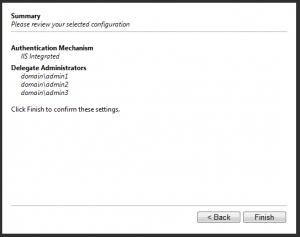
Now that you’re at the Initial Configuration Wizard, proceed through the wizard, selecting IIS Integrated authentication and entering your administrators in the form of domainusername (replace domain with your organization’s AD domain, and username with the sAMAccountName of your administrator.
Click Finish, and if the authentication was successfully changed, you should get a message saying ‘The specified credentials were not accepted”.
Don’t panic at this point. This message is an indication that the authentication was successfully changed and that the Web Module is now listening for IIS to pass through Windows Usernames. The reason you’re getting this message is because IIS is not yet passing through Windows Usernames to the Web Module. This is configured in the next step.
2. Enable Windows Authentication and disable Anonymous authentication in IIS.
Now that the Web Module is expecting IIS to authenticate your users, you need to set up IIS to do this.
- Open IIS by navigating to Start | Control Panel | Administrative Tools and double-clicking on Internet Information Services (IIS) Manager.
- Navigate to the Web Module site or virtual directory in the left hand ‘Connections’ Panel. It will be located under <Server Name><Sites>. For example, MyServer->Sites->Default Web Site->webmodule.
- If you’re running IIS7 ( Windows Server 2008, Vista or Windows 7)
- Select the Web Module site and ensure the ‘Features’ tab is selected at the bottom of the middle pane.
- Double-click the ‘Authentication’ feature.
- Right-click ‘Anonymous Authentication’ and select Disable
- Right-click and ‘Windows Authentication’ and select Enable
- Restart IIS by selecting your server in the right hand connections pane, and clicking Restart in the ‘Actions’ pane on the right.
- If you’re running IIS6 or 5.1 (Windows Server 2003, Windows XP)
- Right-click Web Module site and select Properties.
- Go to the Directory Security tab
- Under ‘Authentication and access control’ click the Edit button.
- Uncheck ‘Enable anonymous access’ and check ‘Integrated Windows authentication’
- Restart IIS by right-clicking the local server, select All Tasks, and then click Restart IIS.
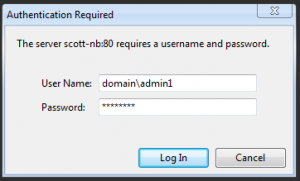
If you added your own Windows login name as an administrator in step 1, you can now test the authentication is working. Go back to the Web Module in your browser and click Refresh. You will be presented with an ‘Authentication Required’ dialog where you can enter your username and password.
Again, ensure your username is in the form of domainusername. Click OK, and you should log straight into the Web Module using Windows Authentication.
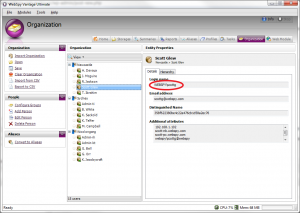
3. Ensure all users in your Organization screen have a login name in the form of domainusername
Now your administrator account can log into the Web Module using Windows Authentication, but all other users will not be able to log in unless they have their login name specified in the form of domainusername. This is done in Vantage Ultimate on the Organization screen.
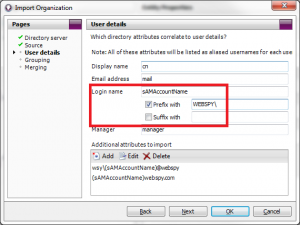
If you’re importing your users from LDAP or LDIF, make sure you use the ‘Prefix’ option on the User Details page to prefix domain before your imported usernames. For example:
4. Connect Vantage and the Web Module using the new authentication details, and synchronize your Organization.
In order to publish information to the Web Module, you need to add a connection between Vantage and the Web Module. This is done on the Web Module screen in Vantage Ultimate.
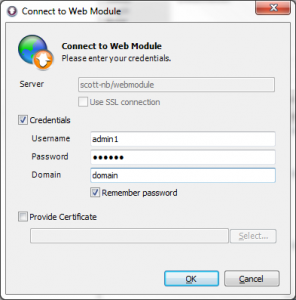
- Click Add Web Module (or if you already had a web module before changing the authentication details, select it and click Properties)
- Enter the server & virtual directory of the Web module, and enter the correct credentials ensuring domain is specified.
- Click OK to connect.
Once connected, synchronize Vantage with the Web Module by clicking the Synchronize link in the Web Module task pad. You may also want to provide permissions for your users in the Permissions section on the Web Module screen.
That’s it. You can now test that everything is working by getting one of your users to access the Web Module’s URL. They should sail straight in with no username/password prompt.
I hope this helps! Please let me know your feedback by emailing me, or leaving a comment below.


Leave A Comment